As you awaken aboard the Nautiloid, a ship of the nightmarish Mind Flayers, chaos reigns around you. With a parasitic tadpole writhing in your head, your only thought is survival. In Baldur’s Gate 3: Escape the Nautiloid, players must navigate this treacherous vessel, battling grotesque foes and forging alliances with unlikely companions like Lae’zel and Shadowheart. Will you outsmart the horrors lurking in the shadows and find your way to freedom before it’s too late? Dive into our comprehensive walkthrough to master this thrilling prologue and embark on your epic journey.
After starting a new game in Baldur’s Gate 3 and creating a character, you will find yourself aboard the nautiloid, the mind flayers’ ship. Due to the clash between the illithids and the githyanki, the ship was transported to hell – you must find a way back. On this page of the guide, we have described how to escape from the nautiloid, recruit the Intellect Devourer Us, the warrior Lae’zel, the cleric Shadowheart and survive the battle on the ship’s bridge.
Awakening
Awakening in Baldur’s Gate 3 marks the beginning of a harrowing journey as players find themselves aboard a Nautiloid, captured by mind flayers and infected with a parasitic tadpole. This moment is pivotal, setting the stage for both personal transformation and the overarching narrative. As characters grapple with their new abilities and the looming threat of becoming mind flayers themselves, they must forge alliances and make crucial decisions that will determine their fate. The escape from the Nautiloid is not just a physical flight from danger; it symbolizes the struggle against inner demons and the awakening of latent powers that could either lead to salvation or destruction.
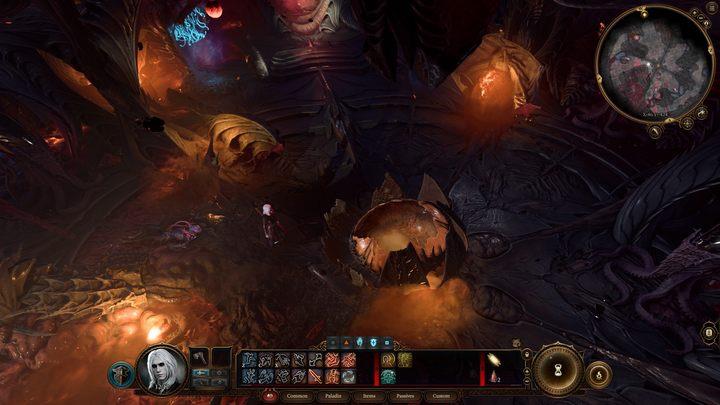
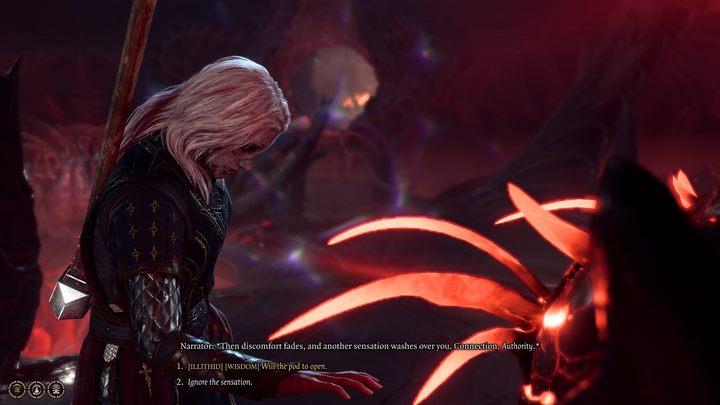
You’ll wake up in an open mind flayer pod, infected with an illithid tadpole – something you shouldn’t worry about until later. First you need to find a way out of the Nautiloid. In the starting room, you will find the corpse of a mind flayer (search it to find a gem you can later sell) and a hatchery. You can investigate the hatchery – a Investigation ability check (DC 10) will reveal that it is unstable and about to explode. If you decide to reach inside, the hatchery will explode, dealing you 1-4 force damage. Fortunately, when you leave the chamber, you will find a regenerating device that will fully heal you. These devices work an infinite number of times on low, medium and high difficulty levels, and only once on the highest, honour mode.
Us – Intellect Devourer
In Baldur’s Gate 3, players can encounter Us, a unique companion known as an Intellect Devourer, during the prologue aboard the Nautiloid. This small, brain-like creature offers both charm and utility, proving to be a valuable ally in combat situations. To recruit Us, players must successfully navigate a series of skill checks that involve freeing him from captivity. While Us adds an interesting dynamic to the gameplay, he only accompanies players through the prologue and does not survive the subsequent crash landing of the Nautiloid. Despite his brief presence, Us exemplifies the game’s blend of humor and strategy, making him a memorable part of the early adventure.
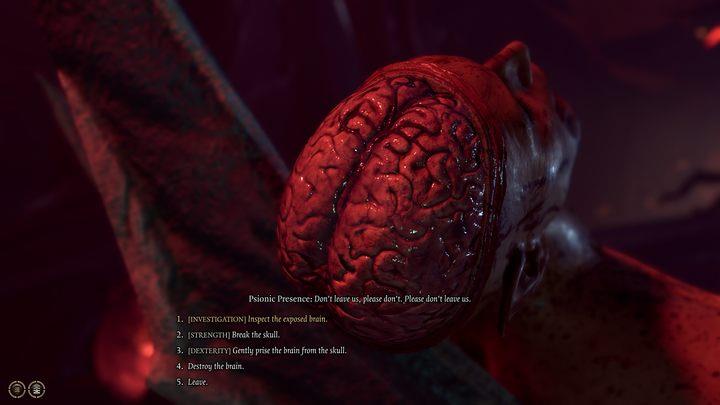
In the next room, notice the elevator in the middle of it. Interact with the mechanism and go up, where you will encounter an individual with a cracked skull and a talkative brain. Talk to it – it’s Us, an Intellect Devourer and one of the minor companions available in the game. After a short conversation, you will have two options to choose from:
- Freeing the brain – you must pass an Investigation skill check (DC 10), Strength (DC 10), or Dexterity (DC 10). You only have one try. If you succeed, Us will join your party as a minor companion and will stay with you for the duration of the prologue. Much later, in the last dungeon of act two, you will be able to recruit the brain again, this time permanently. After freeing Us, you will receive another choice, namely a Dexterity skill check (DC 15) – you can perform a lobotomy on the brain to make it more docile. Don’t do this – if you fail, the brain will run away and leave you. If you succeed, you will receive no benefits and Us will be permanently weakened.
- Destroying or leaving the brain – you will not be able to recruit the Intellect Devourer, neither during the prologue nor later.
If you have recruited Us, wait about thirty seconds before moving to the next room – the first fight in the game will take place there. The newborn Us suffers from a unique status for half a minute, which weakens it significantly. When the status of the newborn disappears, move on.
Meeting with Lae’zel
As you navigate the wreckage of the Nautiloid in Baldur’s Gate 3, you will encounter Lae’zel, a fierce Githyanki warrior trapped in a cage by scouts from a nearby grove. Upon approaching, Lae’zel will telepathically implore you to free her, promising valuable information about a potential cure for the parasite infecting both of you. You have multiple options to resolve this situation: you can convince the scouts to flee, attack them directly, or negotiate with them to learn more about their grove. Successfully freeing Lae’zel not only adds a powerful fighter to your party but also opens up further quests related to her Githyanki heritage and the search for a creche, making this encounter pivotal for your journey ahead.
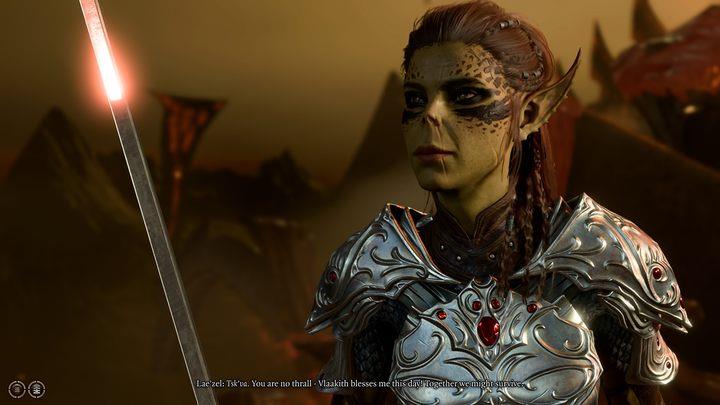
In the next room, you’ll meet Lae’zel, a githyanki warrior. What initially seems like an unpleasant meeting will quickly turn into an alliance. Lae’zel will join your party, and you will automatically face three imps.
Imps are very weak opponents and with a bit of luck you can eliminate them with one hit. They have no resistances or skills, and can use melee and ranged attacks. Eliminate them – don’t use any special skills or spells, catnips and regular attacks will be enough.
Search the corpses in the room (you should find some potions and weapons – axes will come in handy for Strength-based characters like Lae’zel, as throwing them is Strength-based, not Dexterity-based like most other ranged weapons) and head north, climbing along the fleshy nets.
Release Shadowheart
In Baldur’s Gate 3, the quest to Release Shadowheart is a pivotal moment that not only impacts the story but also shapes the player’s relationship with this enigmatic character. As players navigate the Nautiloid, they encounter Shadowheart trapped in a pod, and the decision to free her can significantly influence the narrative trajectory. This act of liberation not only showcases the player’s willingness to engage with companions but also sets the stage for Shadowheart’s complex backstory and her struggles with loyalty and identity. Choosing to release her opens up various dialogue options and potential alliances, enriching the overall gameplay experience.
In this room you will find several unconscious cultists connected to a console with three buttons. The left button has no effect, the middle one will make them attack, the right one will instantly kill them. You can also ignore them – they don’t give you much experience and they don’t have anything valuable on them, just a few pieces of gold.
Shadowheart is trapped in one of the pods in this room. She asks you for help – despite Lae’zel’s reservations, it’s definitely worth fulfilling her request. To free Shadowheart, you need to find the rune that controls the console nearby. Go to the room to the east. You will find a key next to the body near the entrance (it will open the golden box in the room where Shadowheart is locked – you will get some gold and a gem you can sell). In the open chest at the back of the room you will find several healing potions, and on the corpse next to it you will find the required rune. You can also use the console with another prisoner – interaction will turn the imprisoned into a mind flayer. You don’t have to do this – you won’t gain anything.
After obtaining the rune, return to Shadowheart and insert the rune into the console next to her pod. An Arcane check (DC 10) will reveal that the console will open the capsule. Touch the console – you must now use the tadpole’s power to free Shadowheart. A Wisdom check (DC 2) will open the pod – you can now talk to her and allow the cleric to join your party. Then go to the room to the south – it’s time to finish the prologue.
If you ignore Shadowheart, you can still recruit her at the beginning of Act 1, right after getting off the ship. However, she will be furious with you, which will negatively affect her attitude. If you tried to help her but failed the Wisdom skill check, Shadowheart will not be angry, knowing that you tried to help her.
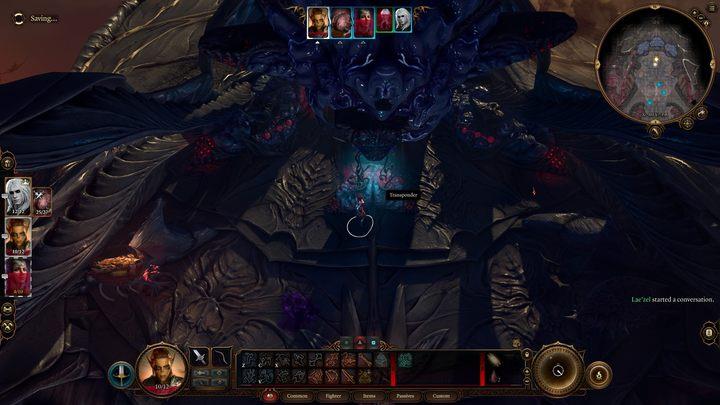
Battle on the bridge
In the Battle on the Bridge segment of the Baldur’s Gate 3: Escape the Nautiloid walkthrough, players must navigate a tense confrontation that tests their strategic skills and combat prowess. As they face off against formidable foes on a narrow bridge, the environment becomes a critical factor in survival. Players are encouraged to utilize their surroundings effectively, employing tactics such as positioning and environmental interactions to gain the upper hand. This battle not only serves as a pivotal moment in the storyline but also challenges players to adapt their strategies in real-time, making for an exhilarating gameplay experience.
Before entering the bridge, exchange the spells that Shadowheart has access to – if you allow her to prepare the Command spell, you will have the opportunity to acquire an excellent weapon. The default keyboard shortcut for displaying your spells is the K key.
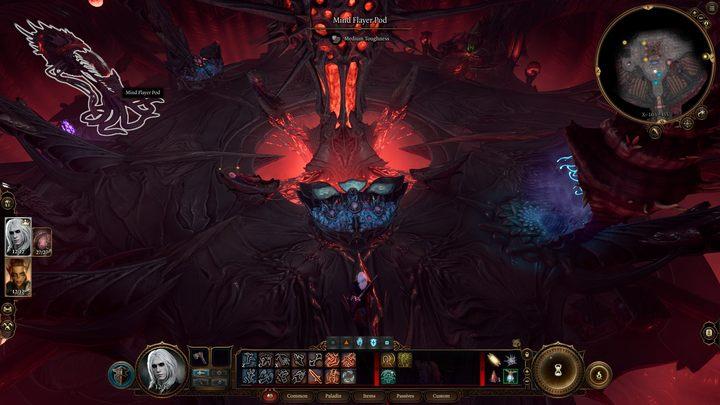
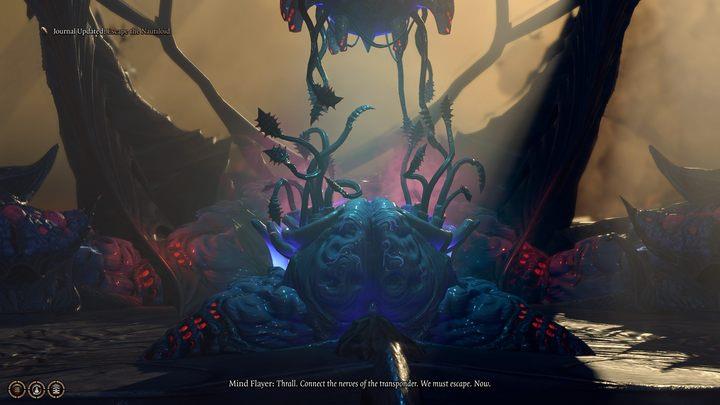
Entering the bridge will start the last fight of the prologue. You have fifteen full turns to reach the console at the other end of the room – interacting with it with any character immediately ends the fight. In practice, however, you have a little less time – Commander Zhalk and the mind flayer are fighting each other inside the room. They are focused only on themselves, but as soon as one of them dies, the other one will attack you – you have no chance against them at the moment. After about five rounds, cambions will also join the fight, appearing at the entrance to the room – don’t try to fight them.
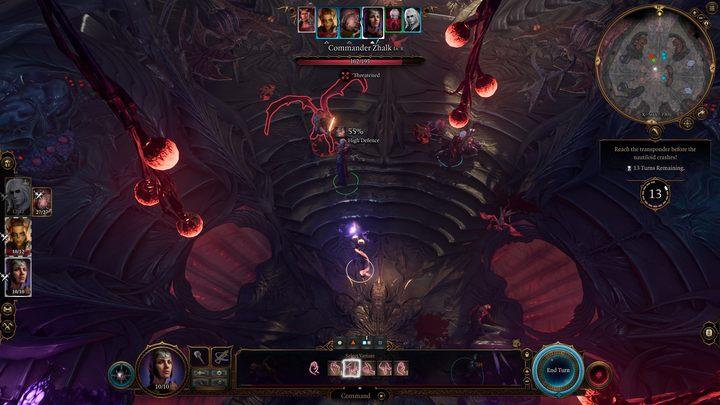
If Shadowheart has prepared a Command spell before the fight, you can make the fight much easier by casting Command on Commander Zhalk. Tell him to drop the weapon – if the spell is successful (55% chance, Shadowheart can cast two spells, so you have two attempts), move one of your characters closer and pick up the weapon from the floor. This is the Everburn Blade – a two-handed sword that deals an additional 1-4 fire damage with each attack. Unarmed Zhalk will distract the mind flayer for much longer, and you will obtain an extremely powerful weapon at this point in the game (it is also worth mentioning that although changing weapons in the middle of a fight costs a main action point, transferring items to other party members is completely free).
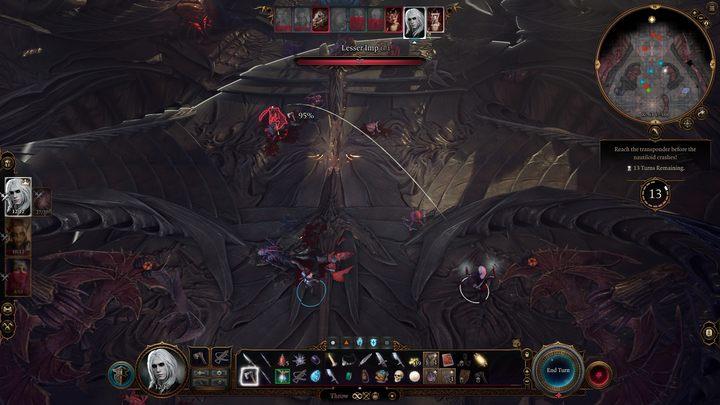
Press forward, fighting imps. If one of your characters cannot attack in a given turn, use the dash action. You can also search the corpses along the way – most of them have nothing of interest, but the dead mind flayers have gems you can sell. There are also acid tubers scattered around the room, which you can throw at enemies.
Remember that to win, you must interact with the console, not defeat all the enemies. When one of your characters reaches the console and spends an action to interact with it, the fight will end in your victory. The nautiloid crashes, and you will find yourselves on the beach, alive, but with a deadly parasite in your heads. This will end the quest and the prologue – you now need to find the remaining party members scattered on the beach.
What are the key challenges when trying to escape the Nautiloid
Escaping the Nautiloid in Baldur’s Gate 3 presents several key challenges that players must navigate to survive the harrowing prologue. Here are the main obstacles:
- Infection and Time Pressure: Players begin with a Mind Flayer tadpole implanted in their character, which adds urgency to the escape. The Nautiloid is under attack, and players must act quickly to avoid being overwhelmed by enemies and the ship’s impending crash.
- Combat Encounters: Throughout the escape, players will face various foes, including Intellect Devourers and Cambions. Strategic combat is essential, as players need to balance fighting with progressing towards their escape route. Notably, players can choose to utilize allies like Lae’zel and Us to aid in battles, but they must also manage their health and resources effectively.
- Environmental Hazards: The Nautiloid is fraught with dangers beyond enemies. Players must be cautious of burning areas that can inflict damage and avoid triggering traps or hazards like acid pools when exploring the ship.
- Skill Checks: Successfully navigating the Nautiloid often requires passing various skill checks, such as Investigation and Dexterity checks, to interact with objects or characters effectively. Failing these checks can lead to missed opportunities or increased danger.
- Navigational Challenges: The layout of the Nautiloid can be confusing, requiring players to use their map and pay attention to environmental cues to find their way through different rooms and reach critical locations like the Helm.
- Critical Decisions: Players must make pivotal choices, such as whether to free or destroy Us (the Intellect Devourer) and how to approach encounters with Mind Flayers and other enemies. These decisions can significantly impact the player’s ability to recruit allies and navigate later challenges in the game.
Successfully overcoming these challenges is crucial for progressing beyond the prologue and embarking on a larger adventure in Baldur’s Gate 3.
What strategies can help defeat the Intellect Devourer
Defeating the Intellect Devourer in Baldur’s Gate 3 requires strategic planning and effective use of your party’s abilities. Here are some key strategies to help you succeed:
- Utilize Area of Effect (AOE) Spells: The Intellect Devourer often appears with other enemies, making AOE spells particularly effective. Spells like Fireball or Thunderwave can damage multiple foes at once, thinning out their numbers quickly.
- Control the Battlefield: Use spells or abilities that can control enemy movements, such as Entangle or Grease. This can limit the Devourer’s ability to approach your party members and create opportunities for ranged attacks.
- Focus Fire: Concentrate your attacks on the Intellect Devourer to eliminate it quickly before it can use its powerful abilities against your party. Coordinating attacks from multiple characters can ensure it goes down before it has a chance to retaliate.
- Exploit Weaknesses: Intellect Devourers are vulnerable to psychic damage. If your party includes characters with psychic abilities, prioritize using those attacks to maximize damage.
- Use Buffs and Debuffs: Spells that enhance your party’s abilities or hinder the Devourer’s effectiveness can turn the tide of battle. For example, using Bless can increase your attack rolls, while Bane can reduce the Devourer’s chances to hit.
- Positioning Matters: Keep your ranged characters at a safe distance while positioning melee fighters strategically to absorb damage and engage the Devourer directly. Avoid clustering together to minimize damage from potential AOE attacks.
- Take Advantage of Environmental Hazards: The Nautiloid is filled with various hazards that can be used to your advantage. For example, throwing objects like Caustic Bulbs at the Devourer can deal additional damage while also creating chaos on the battlefield.
- Manage Resources Wisely: Ensure that you have spell slots and health potions available for healing during combat. If a character is low on health, consider using the Restoration point found earlier in the Nautiloid before engaging in battle.
By employing these strategies, players can effectively take down the Intellect Devourer and progress through the challenges of escaping the Nautiloid.