Stepping into the darker zones of Act 2 without a light source guarantees your party will suffer 1d4 necrotic damage per turn, rapidly depleting your health pool. This guide details exact, step-by-step strategies to mitigate the shadow curse, secure permanent buffs, and optimize your inventory for survival. You will also learn how to free the trapped spirit inside the Moonlantern to completely remove stealth penalties.
Losing 1d4 Necrotic Damage Per Turn: Why Your Party is Dying in the Dark
The Mechanical Trigger
Stepping into the darker zones of Baldur’s Gate 3 Act 2 introduces a lethal hazard. If you wonder why does my party take damage in the shadow lands, the answer is a specific regional debuff. Without a light source, characters suffer the minor shadow curse.
To understand how does shadow curse work mechanically, note that it inflicts 1d4 necrotic damage at the start of every turn. This is not random passive damage; it is strictly tied to turn order. If four characters stand in darkness, your party loses 4d4 HP per round.
The Turn-Based Trap
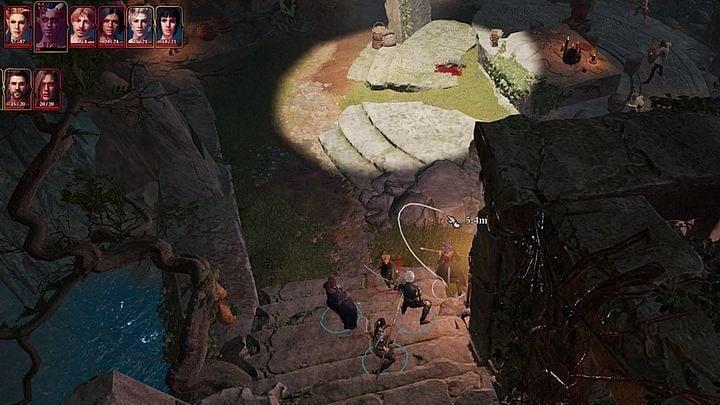
The system aggressively penalizes exploration errors. When a character steps outside a light radius, the game immediately forces a transition into turn-based mode. This is a critical warning for players accustomed to fluid movement.
Sprinting through darker areas without preparation will trap your group. You must secure a reliable light source to maintain normal exploration speed and avoid taking shadow curse damage unnecessarily.
Early Game Mitigation: Torches and Light Spells
* Equip a standard torch in your main hand to immediately negate minor shadow curse for that specific character. Be aware that this occupies a weapon slot, reducing your combat readiness by 1 active item slot until you secure a permanent lantern.
– Cast the Light cantrip on a frontline party member’s armor or weapon. This provides a reliable 30-foot radius of illumination, directly answering whether light spells work in shadow cursed lands without sacrificing your character’s primary action economy or shield.
* Keep your entire party grouped tightly within the 30-foot radius of your designated light bearer. Straying even 5 feet outside this perimeter will instantly trigger the curse mechanics and force an unwanted turn-based state.
– Utilize area-control options like Faerie Fire or Dancing Lights as emergency backups. While they do not replace a permanent light source, they can stabilize a panicked retreat if a light source is accidentally dropped or unequipped during exploration.
* Verify your inventory management before descending from the mountain. Players frequently ask if you can use torches to survive shadow curse; the answer is affirmative, but only if every character carries one or remains strictly huddled around a single magical radius.
The Blessing of Selûne: Securing Last Light Inn
Defending Isobel
Reaching the Last Light Inn is only the first step; ensuring Isobel survival is the true test of this area. Players frequently ask how to get permanent shadow curse protection, and the answer lies entirely in keeping this cleric alive during the ambush. If she falls, the inn’s magical barrier shatters instantly, plunging the sanctuary into darkness and triggering an immediate, unwinnable combat scenario against overwhelming forces.
To guarantee her safety, manually position a high-armor character near her before ending your turn. Do not rely on default AI pathing, as allies may inadvertently pull aggro or leave her exposed to sniper fire. Prioritize eliminating ranged threats, such as the goblin archers stationed on the surrounding rooftops, within the first 2 rounds of the fight. Securing this defense is the absolute prerequisite for maintaining the sanctuary’s integrity and progressing the main narrative.
The Permanent Party Buff
Once Isobel is secure and the ambush is repelled, she grants the Blessing of Selune to your entire active party. This is a crucial mechanical milestone, as it provides a permanent, passive resistance to the environmental hazard. Many players wonder if the blessing of selune works in deep shadow curse zones far beyond the inn’s immediate vicinity, and it absolutely does.
This buff applies globally across the Act 2 map, meaning you can freely explore the darkest corners of the region without relying on cumbersome torches or consumable light spells. However, remember that this protection only neutralizes the minor curse. Venturing into specific areas marked by the major shadow curse will still require a specialized artifact, such as a Moonlantern, to prevent the standard 1d4 necrotic damage per turn.
Moonlantern vs. Pixie Bell: The Optimal Setup
Acquiring a reliable light source is the definitive answer to moonlantern vs pixie bell which is better for long-term survival in Act 2. You can initially obtain the standard Moonlantern by defeating the corrupted druid Kar’niss at his hidden camp in the Shadow-Cursed Lands. However, this artifact traps a celestial spirit inside, creating both a moral and mechanical dilemma for your party composition.
| Item Variant | Acquisition Method | Light Radius | Stealth and Combat Impact | Quest Consequence |
|---|---|---|---|---|
| Standard Moonlantern | Defeat Kar’niss | 30 feet | Emits bright light, imposes disadvantage on Stealth checks | Permanently locks out Halsin’s companion questline |
| Pixie Bell (Freed) | Complete “Free the Pixie” | 30 feet + Blessing | No stealth penalty, grants +1 to all ability checks | Unlocks Halsin as a permanent companion |
This comparison highlights why securing the upgraded version is a priority for players optimizing their inventory.
To discover exactly how to free the pixie in moonlantern, you must bring the artifact to the healer Balthazar at Moonrise Towers and select the specific dialogue option to release the trapped spirit, or perform the dedicated action at your camp. Once freed, the spirit transforms into the Pixie Bell. This upgraded item maintains the necessary 30-foot protection radius but completely removes the severe stealth penalty. Furthermore, it grants a passive bonus, making it the mathematically optimal choice for rogue-heavy builds or players prioritizing tactical positioning over raw illumination.
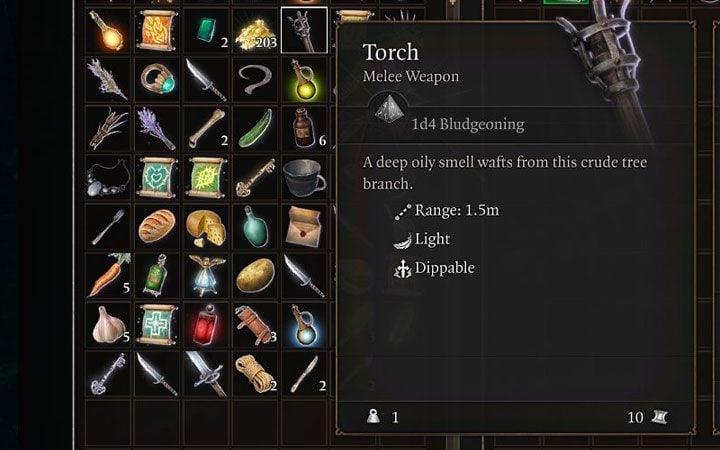
Torch
- The main advantages of torches is that they are easily available (you can find them as loot) and that they do not use up spells.
- The disadvantage of the torch is that you need to place it in the weapon slot. It has to replace the weapon with potentially greater usefulness and higher stats. We recommend passing the torch to those party members who don’t use their weapons that often.
- After finding an extinguished torch, you mustfind a light source and select the option to dip the torch. This will allow you to travel with a burning torch and optionally set enemies on fire with it.
We described how to use a torch in more detail on the page How to light a torch?.
Cherished Locket
- In act 1, you can take on the Child’s Trial quest – we described it in our walkthrough and it relates to the imprisoned girl Arabella in the Druid Grove.
- You must save Arabella, i.e. successfully pass the nature or persuasion check.
- At the end of the quest, you can receive an amulet from the girl’s parents. After equipping Cherished Locket it can light up the surroundings within a 12 meters radius. It works just like the Dancing Lights spell.
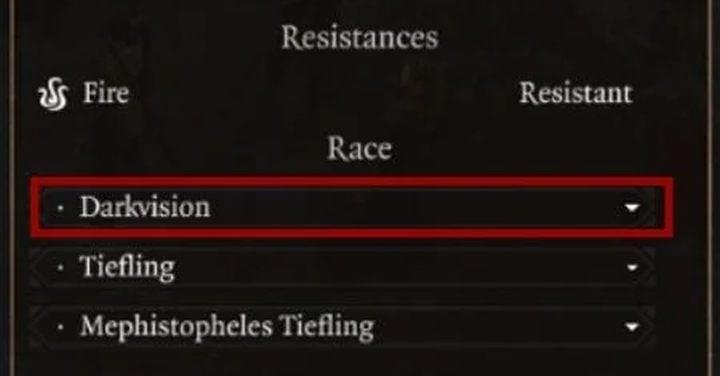
Darkvision as a racial feat
- Selected races may have a racial feature called Darkvision. It allows them to see in the dark within a radius of 12 meters, removing the need to use spells or torches.
- Tieflings, Elves, Gnomes, Dwarves, Half-elves and Half-orcs can use Darkvision.
- As for Drows, they can use a better version called Superior Darkvision. It doubles the range of vision in the dark to 24 meters.
Lifting the Curse Permanently: The Halsin Questline
- Initiating the rescue – To understand how to lift the shadow curse permanently in bg3, you must first speak with Halsin at the Last Light Inn after securing the area. He will explain that the land’s corruption stems from the fractured soul of a spirit named Thaniel. Before proceeding, you are required to travel to the House of Healing in Reithwin Town and retrieve the necessary artefact from the basement morgue. This specific item acts as the magical anchor for the entire ritual.
- Defending the ritual site – Once you have the artefact, travel to the designated riverbank location with Halsin in your active party. When you place the artefact, a portal to the Shadowfell opens. Halsin will transform into a bear to guard the physical realm while you cross over. You must enter the portal to find the missing half of the spirit. During this sequence, be prepared to defend the area from undead waves for at least 3 rounds. If the artefact is destroyed by enemies, the ritual fails permanently for that playthrough.
- Reuniting the spirit – Inside the Shadowfell, navigate the environmental puzzles to locate the young, hidden version of Thaniel. You will need to use the artefact to safely transport him back through the portal to the material plane. Reuniting him with his other half is the final mechanical step required to resolve the questline and officially recruit the druid as a permanent companion.
- Environmental and narrative consequences – Players often wonder what happens after you lift the shadow curse. The transformation is immediate and dramatic. The blighted, monochromatic terrain surrounding the riverbank instantly reverts to a vibrant, grassy woodland. This permanently removes the minor shadow curse debuff from that specific zone, reveals a hidden path directly to Moonrise Towers, and grants access to new vendors and dialogue options that are otherwise inaccessible.
Common Questions About Shadow Curse Survival
Can Shadowheart survive the shadow curse without light?
She survives only if she remains strictly within the 30-foot radius of another party member’s active light source. Her narrative background grants no mechanical immunity to the standard 1d4 necrotic damage per turn. For reliable BG3 shadow lands tips, always assign her to stay near the designated light bearer or cast Light on her armor before combat.
What if I don’t have a Moonlantern?
You can progress safely by equipping a standard torch or applying the Light spell to your frontline characters. While this method negates the minor hazard, it restricts your tactical options by permanently occupying a main-hand weapon slot. Consulting any comprehensive shadow curse FAQ will confirm that securing the freed Pixie Bell is the only optimal way to gain full protection without sacrificing combat readiness.
Does the Blessing of Selûne protect against all dark zones?
The blessing only neutralizes the minor environmental hazard found in the lighter areas surrounding the Last Light Inn. Venturing into the deepest, most corrupted zones will still trigger the major shadow curse, inflicting damage regardless of the sanctuary’s barrier. You must carry a dedicated artifact to safely navigate these specific high-risk corridors without taking continuous health loss.
How do I avoid accidentally triggering turn-based mode in the dark?
You must ensure every single character in your active party is within the illuminated radius before moving. The game engine aggressively monitors position, and stepping even 5 feet outside the light will instantly force a transition into combat turns. Grouping your party tightly is the most effective method to prevent unwanted interruptions during exploration.
Age Ratings and Play Habits
Age ratings and content warnings are clearly indicated on the packaging and official digital store pages. The formal Baldur’s Gate 3 age rating is 18 (PEGI) or Mature (ESRB) due to depictions of intense violence, blood, and partial nudity. This game may not be suitable for individuals with photosensitive epilepsy or a tendency toward compulsive gaming behavior. If you experience flashing light effects during magical combat or environmental transitions, take a break and adjust your display settings immediately to mitigate visual strain.
Securing Your Build Before Moonrise Towers: Are You Ready for the Absolute?
Effective Moonrise Towers preparation is the final mechanical hurdle before the climax of the narrative. By the time you reach the BG3 Act 2 endgame, your party should ideally be between levels 7 and 9. At this threshold, encounter design shifts heavily toward multi-enemy engagements and devastating crowd control mechanics. Ensure your frontline characters possess at least one reliable method of disengaging or temporary hit point generation, as melee combatants will face concentrated focus fire from elevated enemy positions.
Inventory optimization is equally critical for sustained survival. Hoard consumables like standard potions of healing and elixirs of hill giant strength, as merchant stock in the immediate region is strictly limited and heavily marked up by local vendors. Save your game frequently across 3 different manual slots to prevent irreversible narrative dead ends or sudden party wipes during scripted ambushes.