Facing the Beastman of Farum Azula in Elden Ring can be a daunting challenge for even seasoned players. Nestled within the eerie confines of Groveside Cave, this optional miniboss wields a massive cleaver and unleashes a flurry of devastating attacks that can catch you off guard. However, with the right strategy and timing, you can turn the tide in your favor. In this guide, we’ll explore effective techniques to outmaneuver this ferocious foe and emerge victorious, claiming valuable rewards like the Flamedrake Talisman and a hefty bounty of runes. Prepare yourself as we delve into the tactics that will help you conquer one of Limgrave’s most fearsome guardians.
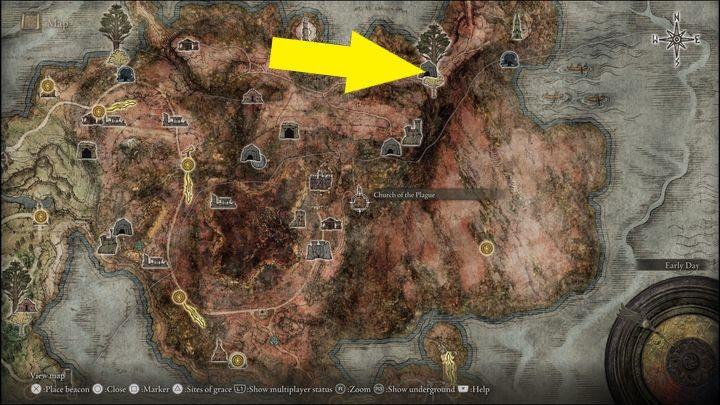
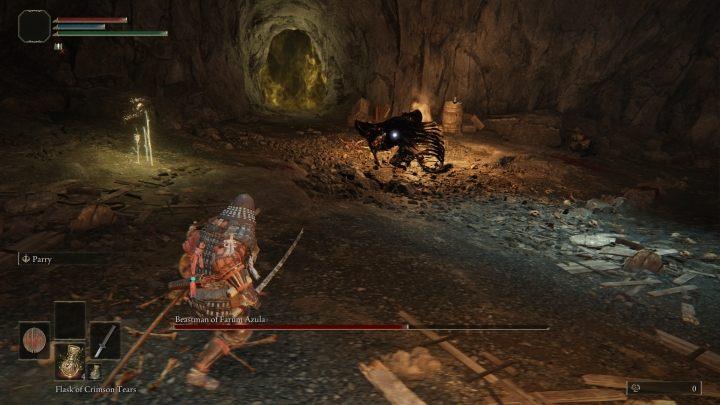
The Beastman of Farum Azula is a boss that attacks with long chains of attacks, moreover, he is quite fast and can cover considerable distances with his moves. You’ll find the boss in Limgrave, in Grovesite Cave to be exact. This is an optional boss that isn’t required to beat the game.
Locations
The Beastman of Farum Azula can be encountered in two primary locations within Elden Ring: Groveside Cave and Dragonbarrow Cave. The Groveside Cave, situated in the Limgrave region, is an early-game optional dungeon where players can find this miniboss. To reach it, players must navigate north from the Church of Elleh, defeating various enemies along the way. In contrast, the Dragonbarrow Cave offers a more challenging encounter with the Beastman, rewarding players with greater runes and loot. Both locations provide distinct environments for players to strategize and engage in combat against this formidable foe.
Beastman of Farum Azula in Limgrave:

You will meet the boss for the first time in Limgrave, and more specifically in the Coastal Cave.
Beastman of Farum Azula in Caelid:
The second version of the boss is Caelid, more specifically in the Dragonbarrow Cave.
Reward for defeating
Defeating the Beastman of Farum Azula rewards players with valuable loot that enhances their journey in Elden Ring. Upon vanquishing this formidable foe, players will receive 1,000 Runes from the Groveside Cave encounter and a substantial 65,000 Runes if they face him in the Dragonbarrow Cave. Additionally, players will obtain the Flamedrake Talisman, which provides resistance against fire damage, making it a useful item for future battles against fiery foes and environments. This combination of Runes and a powerful talisman makes defeating the Beastman a worthwhile endeavor for any Tarnished adventurer seeking to strengthen their character and progress through the game.
The rewards for defeating the Beastman of Farum Azula are the FlamedrakeTalisman, and 1000 Runes.

For defeating the second version of the boss, you will receive Red Dragon Talisman 2Flamedrake Talisman 2, and 65,000 Runes.
General tips
To effectively tackle the Beastman of Farum Azula in Elden Ring, players should consider several general tips to enhance their gameplay experience. Preparation is key: ensure you have a well-upgraded weapon and sufficient healing items before engaging in the fight. Learn the boss’s attack patterns by observing and timing your dodges; patience is crucial, as rushing in can lead to unnecessary damage. Utilize Spirit Ashes to summon allies during the battle, which can help distract the Beastman and provide openings for your attacks. Additionally, exploration is vital; uncovering hidden items and upgrading your gear can significantly bolster your chances of victory. Finally, don’t hesitate to take breaks if you find yourself struggling; returning with a fresh perspective can make all the difference.
- Wait for him to finish his series of hits. The boss mostly resorts to these types of attacks and the series can reach up to 5-6 hits. During his final attack (during which he often jumps into the air), you can approach and attack him.
- It is not worth blocking his attacks – this will deplete a lot of your stamina. Instead, back away when he attacks, and then, after completing his attack chain, initiate your attack.
- It is a good idea to get close to the boss to trigger his series of attacks and then to withdraw.
Mage build – how to fight?
To effectively fight the Beastman of Farum Azula as a mage in Elden Ring, you should leverage your ranged capabilities while maintaining a safe distance from the boss’s powerful melee attacks. Begin by using spells that deal significant damage, such as Glintstone Pebble or Comet, to chip away at its health. It’s crucial to observe the Beastman’s attack patterns; after it finishes a combo, quickly reposition yourself and cast your spells before it can retaliate. Utilizing Spirit Summons, like the Lone Wolf Ashes, can also distract the boss, allowing you to focus on casting without being targeted. Remember to manage your stamina wisely, as dodging is essential when the Beastman lunges or performs its multi-hit combos. By maintaining distance and timing your attacks carefully, you can defeat this formidable foe while minimizing risk.
We recommend starting the boss by getting relatively close to the boss – this will provoke him to use a long series of attacks. Then, retreat by running or rolling (watch out for your stamina bar), and when he is done, attack the boss.

Your task should be slightly easier when playing as a mage, as you don’t have to waste time approaching the boss once he’s done with his combo. The Magic Glintblade and Glintstone Pebble spells work wonders against the boss.

Remember that after you gain some distance from the boss he can lunge at you while thrusting his weapon forward. The blow hits in a straight line but has a long range. If you’re playing as a mage you’ll be keeping your distance, which means you’ll be provoking him to use this attack often. Therefore, when you see him lunge forward, dodge aside.
Melee build – how to fight?
To effectively combat the Beastman of Farum Azula in Elden Ring, players should focus on a melee build that maximizes both damage output and survivability. Equip weapons that deal significant physical damage, such as the Giant-Crusher or Marais Executioner’s Sword, to capitalize on the Beastman’s vulnerability to stagger effects. Utilize talismans like the Rotten Winged Sword Insignia to enhance damage from consecutive hits, and consider buffs like Golden Vow for increased attack power. Maintaining a balance between offense and defense is crucial; dodge the Beastman’s powerful attacks while looking for openings to strike. Remember to manage stamina effectively, as continuous melee engagement can quickly deplete your resources, leaving you vulnerable.
The Beastman of Farum Azula is a fairly aggressive and quick opponent that will keep pressing on you. Keep your distance by walking backwards, preferably with a raised shield. When the boss charges forward, dodge but don’t attack immediately. After the charge, the opponent makes a wide swing – always attack after this move. This is a good opportunity to attack from a strong strike with R2 or from a strong strike from a jump.
When the opponent raises his sword up, it means that he will soon make a long jump in your direction. Let him do it and either dodge or block the attack with a shield. You can attack him now with a few quick hits.
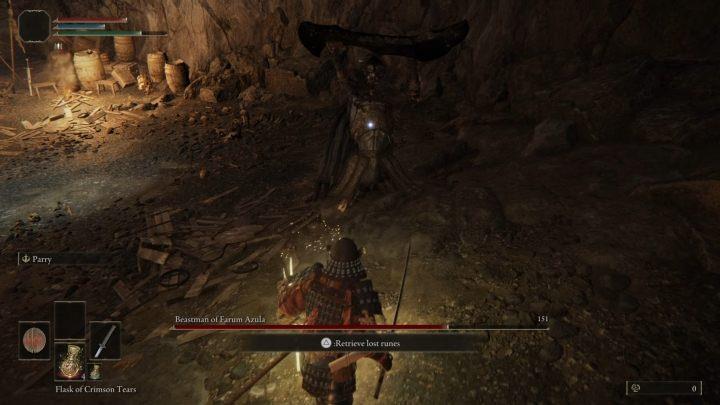
The Beastman of Farum Azula usually attacks with two slashes of his greatsword. You can parry them with the shield and perform a critical hit to deal massive damage. When the opponent gets angry, he makes a roar that restores his poise. You have to be especially careful when dealing with an attack consisting of four sword strikes. Be careful not to attack the boss after the third jump attack, or you’ll be hit with the fourth slash.
What are the best weapons to use against the Beastman of Farum Azula
To effectively combat the Beastman of Farum Azula in Elden Ring, certain weapons and strategies can significantly enhance your chances of victory. Here are the best weapon choices and tactics to consider:
Best Weapons
-
Greatswords and Colossal Weapons
- These weapons deliver high damage per hit and can stagger the Beastman, especially with heavy attacks. Using a greatsword allows you to capitalize on openings after the Beastman’s attacks.
-
Straight Swords
- The standard R2 attack with straight swords consistently staggers the Beastman, making it an effective choice for interrupting its attack patterns. This is crucial for maintaining pressure during the fight.
-
Jumping Heavy Attacks
- Performing a jumping heavy attack can deal significant damage, especially if timed correctly after the Beastman’s combos. This tactic allows you to hit the boss while avoiding its sweeping attacks.
-
Spears or Thrusting Weapons
- These weapons can keep you at a safe distance while still dealing damage, allowing you to poke at the Beastman without getting too close to its cleaver swings.
Recommended Strategies
- Maintain Distance: Keep your distance to observe the Beastman’s attack patterns. Wait for openings after its lunges or when it howls before closing in for an attack.
- Utilize Shields: If engaging in melee, bring a shield to absorb hits while you recover stamina. This is particularly useful against its powerful cleaver strikes.
- Spirit Summons: Consider using Spirit Summons to distract the Beastman, allowing you to land hits while it focuses on your summon.
By combining these weapon choices with strategic gameplay, you’ll be better equipped to take down the Beastman of Farum Azula and claim your rewards.
What are the best shields to use against the Beastman of Farum Azula
To effectively defend against the Beastman of Farum Azula in Elden Ring, selecting the right shield can make a significant difference. Here are the best shields to consider for this encounter:
Best Shields
-
Beastman’s Jar-Shield
- Type: Medium Shield
- Physical Absorption: 95%
- Weight: 5.0
- Description: This shield offers a balanced mix of defense and agility, making it ideal for blocking the Beastman’s powerful cleaver attacks. It can also be infused with Ashes of War, enhancing its versatility in combat. The Beastman’s Jar-Shield is dropped by the Beastmen found in Crumbling Farum Azula, making it a suitable choice for this fight.
-
Fingerprint Stone Shield
- Type: Greatshield
- Physical Absorption: 100%
- Weight: 29.0
- Description: While heavy, this shield provides excellent physical damage reduction and can withstand the Beastman’s attacks effectively. Its high stability makes it suitable for players focusing on a strength build, allowing them to absorb damage without worrying about stamina depletion.
-
Greatshield Talisman
- While not a shield itself, equipping this talisman boosts your guard effectiveness, making any shield more effective against incoming attacks. It can be particularly useful when facing the Beastman’s sweeping cleaver strikes.
Strategy Tips
- Timing Your Blocks: Pay attention to the Beastman’s attack patterns and time your blocks accordingly to minimize stamina loss.
- Combine with Dodging: Use a combination of blocking and dodging to avoid taking damage while maintaining pressure on the Beastman.
- Utilize Stamina Efficiently: Ensure you have enough stamina to block and counterattack after absorbing hits.
By equipping one of these shields and employing smart defensive tactics, you can improve your chances of overcoming the Beastman of Farum Azula.