In the unforgiving realm of Elden Ring’s Shadow of the Erdtree, one formidable foe stands tall: Bayle the Dread, a hulking dragon with a legacy of battle-scarred ferocity. Located deep within the crater of Jagged Peak, this optional boss presents a daunting challenge even for the most seasoned Tarnished. But fear not, for with the right strategies and gear, you can conquer this ancient beast and claim victory over one of the DLC’s most fearsome encounters. Dive into our comprehensive guide to uncover the secrets of defeating Bayle the Dread and emerge triumphant in this epic showdown.
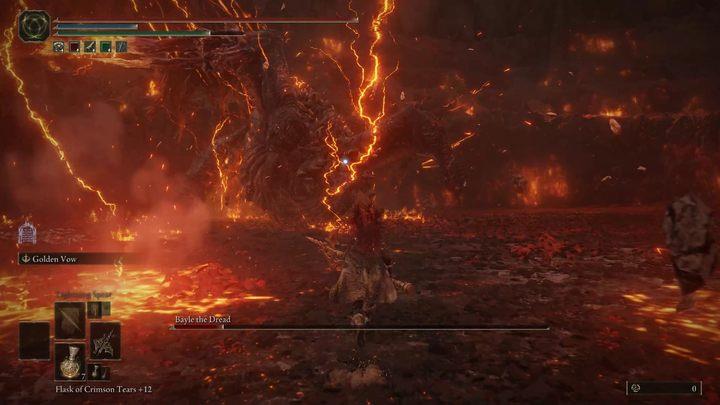
Bayle the Dread is the most powerful optional boss in the expansion Shadow of the Erdtree. You will face him on the Jagged Peak Summit, a location accessed by a linear path that begins in the dragon’s lair, a cave located south of Castle Ensis. Before facing the boss, go to the Grand Altar of Dragon Communion, south of the lake located right by the Dragon’s Pit exit, and complete the dialogue with the Dragon Communion Priestess. The path to Bayle leads through several mini-bosses located around the Jagged Peak. On this page of the guide, you’ll learn how to prepare for the fight with Bayle, how to fight him and what rewards you will receive for defeating him.
[yt=YR@9wbsVT6thok]
Rewards for defeating
Defeating Bayle the Dread in Elden Ring’s Shadow of the Erdtree DLC yields substantial rewards. Upon victory, players receive 490,000 Runes and the Heart of Bayle. The Heart of Bayle can be exchanged at the Grand Altar of Dragon Communion for either Bayle’s Flame Lightning or Bayle’s Tyranny, both powerful incantations suitable for Dragon-based Arcane builds. These rewards make the challenging fight worthwhile, especially for those seeking to enhance their magical abilities.
For defeating the boss, you will receive 490,000 runes and the Heart of Bayle. It works the same way as other items received for defeating other main bosses – the only difference is that they cannot be exchanged by Enia at the Roundtable Hold. Instead, it can be done by the aforementioned Grand Altar of Dragon Communion. You can get:
- Bayle’s Flame Lightning – incantation, deals a blow with a huge claw, fire and electricity damage.
- Bayle’s Tyranny – incantation, creates a huge wave of fire.
How to prepare for the fight with Bayle?
To prepare for the fight against Bayle the Dread, it’s crucial to have the right equipment and strategy. Opt for a light equip load to enhance mobility, and consider using weapons like the Dragon King’s Cragblade or the Dragon-Hunter’s Great Katana, which are effective against dragons. For casters, spells such as Ekzykes’s Decay and Meteorite of Astel can be beneficial. Additionally, bring items like Dragonwound Grease or Dragon Communion Grease to boost damage output. Talismans such as the Blue Dancer Charm and Godfrey Icon can also provide valuable benefits. If you’re using a Mimic Tear, equip it with a shield and a frost weapon to exploit Bayle’s weakness to frost. Lastly, ensure you have a well-rounded Physick setup, including Cerulean Hidden Tear for emergency situations.
Bayle is the most difficult optional boss in the DLC and is comparable to the final boss. Therefore, you should make sure to prepare yourself beforehand. Stock up on:
- Scadutree Blessing at least level 15 – each level of Scadutree Blessing increases the damage you deal and reduces the damage you take. The higher it is, the better – the maximum blessing level is 20, and before the fight with Bayle it should be at least at level 15. You can increase your blessing level by collecting Scadutree Fragments. We also recommend defeating the boss Commander Gaius near the Shadow Keep – it’ll earn you as many as five fragments.
- Dragon-Hunter’s Great Katana – this powerful weapon is designed to fight dragons. Its dedicated special attack, the Dragonwound Slash, deals enormous damage to dragons and will make the fight against both Bayle and the smaller dragons guarding his lair much easier. If you intend to fight Bayle, you will already have this weapon in your possession – it is dropped by the Ancient Dragon Man, whom you will face at the end of the Dragon’s Pit, the only passage to the Jagged Peak.
- The Spear of the Impaler – if you don’t want to use a katana, this weapon also works exceptionally well against Bayle. Its strong attack is a spear throw, which will allow you to damage Bayle even from a distance and easily hit his weak point. The Spear of the Impaler is one of the rewards you can get in exchange for the Remembrance of the Impaler, which you receive after defeating Messmer the Impaler.
- Igon – Igon is an NPC you’ll encounter twice on your way to the Jagged Peak – once near the entrance to the Dragon’s Pit and once after defeating the two dragons at the side of the mountain. Completing the dialogue with Igon during both encounters will allow you to summon him during combat, which may make the fight a bit easier. Be careful – unlike other helpful NPCs, you will find Igon’s summon sign right after entering the arena, after the fight has started. If you’re not careful, Bayle can hurt you while you’re trying to summon him.
Bayle in a nutshell
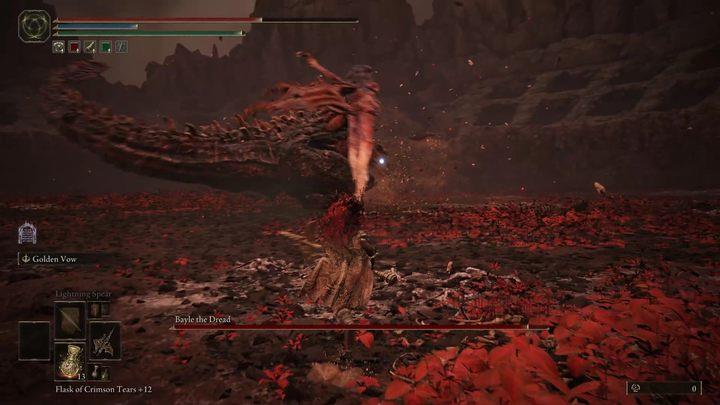
Bayle the Dread is a formidable Legend Boss in the Shadow of the Erdtree DLC for Elden Ring. He is the forefather of the drakes and a sworn enemy of the ancient dragons, notably having clashed with Dragonlord Placidusax in a legendary battle that left both severely wounded. Found at the summit of Jagged Peak, Bayle is an optional boss known for his powerful fire and lightning attacks, as well as his unique appearance, missing a leg and much of his wings. Defeating him requires strategic use of dodges, elemental resistances, and exploiting his weaknesses, particularly targeting his head and wounded leg. Despite being optional, Bayle offers a significant challenge and valuable rewards, including the Heart of Bayle, which can be used in Dragon Communion incantations.
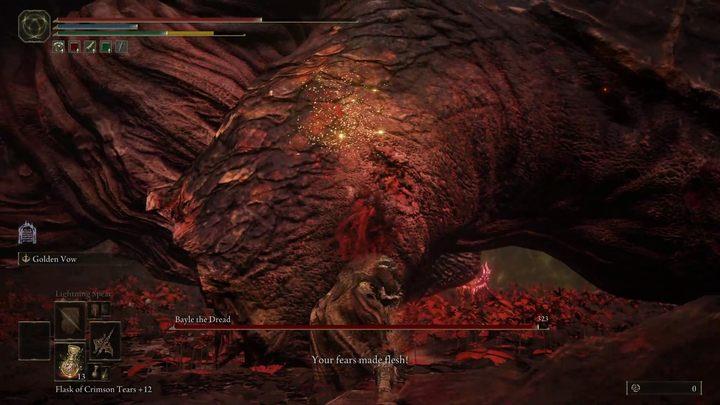
- Bayle has three weak points – his head, a torn wing and the stump from his severed leg. The head and wing take full damage, the stump takes reduced damage, but attacking it reduces the boss’s stance faster, leaving it vulnerable to staggering.
- The biggest threat is the camera – if necessary, unlock the camera and sprint away from him, dodging if you hear an electrifying sound.
- Blocking won’t help much in this fight – Bayle is a huge boss whose melee attacks will often pierce through your shield. Focus on dodging.
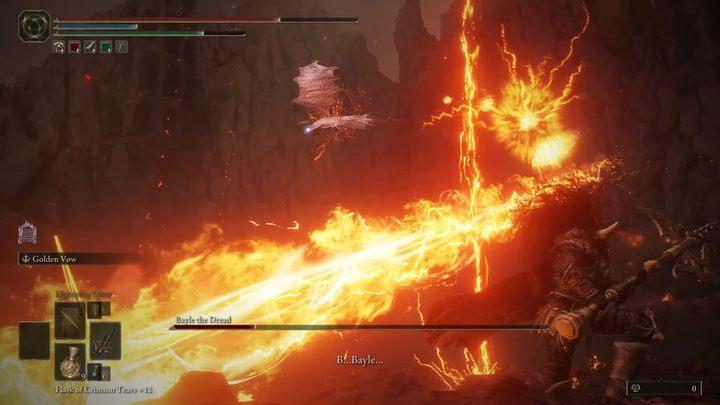
- The fire-electric breath attack has three variants – straight ahead (sprint to the side, then turn back when the dragon starts breathing), from side to side (dodge through the fire) and from above (sprint away from the boss).
- You can recognize the grab attack by the electricity in Bayle’s mouth – dodge to the side when he jumps towards you and you will have plenty of time to deal damage.
- When Bayle jumps to the other end of the arena, be ready for a breath attack straight ahead if he is looking at you (sprint to the side) or a tail attack if his back is turned away from you (dodge over the tail).
- When Bayle jumps up, dodge to the side just before he lands to avoid being crushed. In the second phase, after Bayle lands, run away from him to avoid the pillars of fire.
- Be on the lookout for a blow with an electrified torn wing – the boss will be vulnerable to attack after it. In the second phase, the blow will also trigger lightning strikes, which you will have to avoid. A blow from above may be followed by a second one, and a lunging blow may be followed by a bite.
- After the roar, sprint to avoid the lightning strikes.
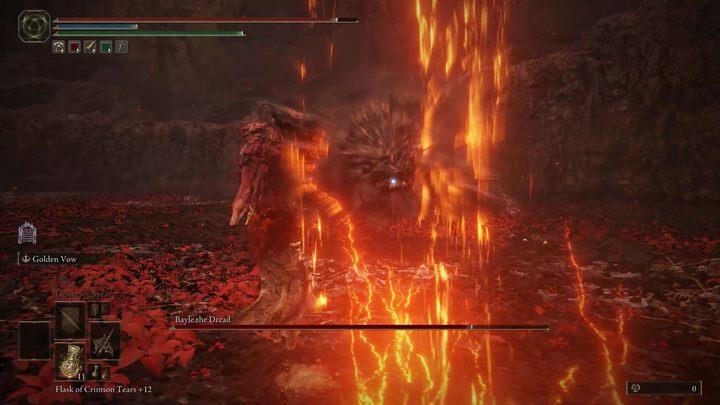
- The second phase begins when the boss has approximately 66% health left. Run away from him to avoid the pillars of fire, sprint diagonally in the opposite direction while aiming the camera at the boss to avoid the fireballs, then dodge towards the boss to avoid being hit into the ground.
- The huge fire laser attack consists of two parts. The horizontal laser will not hit you – dodge with a delay to avoid the explosion afterwards. To avoid the vertical laser, dodge towards the laser, then dodge to the side with a delay before the explosion.
- When the boss electrifies his entire body, he prepares a charged wing strike from above. Dodge it, wait for the ground beneath you to move, then jump to avoid the explosion.
How to fight Bayle?
To defeat Bayle the Dread, you’ll need a combination of strategy and the right equipment. Start by equipping weapons that deal bonus damage against dragons, such as the Dragon-Hunter’s Great Katana, and apply Dragonwound Grease for increased effectiveness. Bayle is not parryable, so focus on dodging his attacks, which include powerful bites, stomps, and fire/lightning breaths. Summoning allies like Igon or the Mimic Tear can help draw his aggro while you recover and plan your next moves. Use jump attacks and charged attacks to stagger Bayle, especially during his second phase. Keep a safe distance when he uses area-of-effect attacks like Burning Skies or Bayle’s Tyranny. Finally, utilize items like Cerulean Hidden Tear in a mixed Physick to quickly end his first phase and conserve resources for the intense second phase.
Fighting Bayle is a matter of practice. The boss has many attacks that are difficult to avoid, but they are easy to recognize by their unique animations – try to learn his attack animations and the right moments to dodge. Most of the boss’s body suffers marginal damage, but he has three weak points – his head, his mangled right wing and the stump of his severed left leg. The head and wing take full damage, so you should attack them most often. The stump takes less damage, but attacking it faster reduces the boss’s stance, which will eventually expose it to a critical hit. When attacking the stump you are usually safe until Bayle is breathing fire downwards. If you’re supported by allies during the fight, you can keep attacking the stump while Bayle is occupied with someone else.
The biggest problem in this fight will probably be the camera. Bayle is huge, so if he pushes you against the wall or you get under him, your visibility will be negligible. If you find yourself in this situation, unlock the camera and try to move away from him. If you hear an electrifying sound, start dodging to avoid the attack.
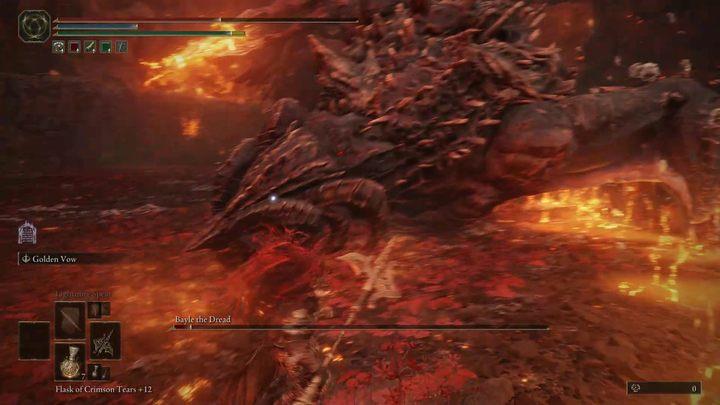
The boss’s size also means that shields won’t be of much use here – most of the boss’s attacks pierce through the block due to their large hitboxes or the elemental damage they deal. It will be more efficient to master dodges – they will also allow you to be close to the boss’s head more often and deal damage to it.
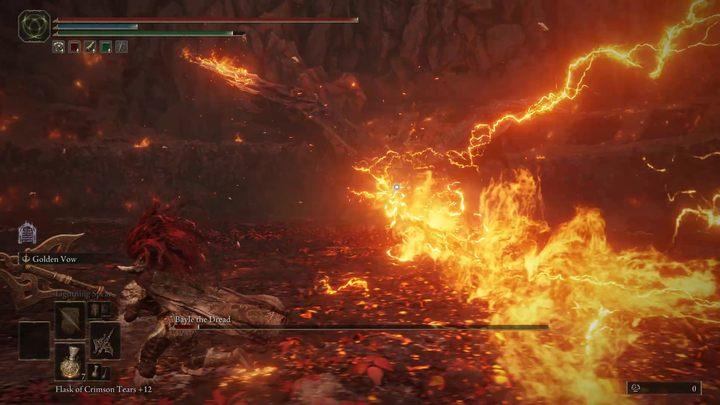
As befits a dragon, one of Bayle’s attacks is a fire-electric breath. This attack has three variants – a forward one (sprint to the side, then turn back when the fire starts coming towards you), side to side (you have to dodge through the flames) and from above (Bayle uses it when you are close – run away from him quickly). Some bite and wing combos can also sometimes result in him breathing out from above, so be ready for that. If you get in front of the side of Bayle’s head while he is breathing out fire, you will have a moment to deal damage.

The grab attack is Bayle’s most predictable attack – you will recognize it when the dragon leans back and electricity starts coming out of its mouth. After a while, he will jump towards you and try to grab you – dodge to the side. After this attack, you have a moment to freely attack the head.
Occasionally Bayle will jump to the other end of the arena – keep the camera locked on him. If he is facing you, he intends to breathe fire straight ahead. If his back is turned, he will immediately try to hit you with his tail – dodge over his tail just before it hits. The jump backwards is also an attack – Bayle can slightly rise up and try to bite you by jumping towards you.

During both phases of the fight, Bayle can also fly into the air and slam into the ground in an attempt to crush you. You must dodge to the side just before he lands the hit. In the second phase, the impact will also trigger several delayed fire columns around the boss – unlock the camera and move away to avoid the fire.

Stay on the lookout for wing attacks too – Bayle can lift it and electrify it, then hit the ground with it from above. Dodge just before the blow – both the head and the wing remain on the ground for quite a long time, which will allow you to land several safe hits. In the second phase, this attack may be repeated twice, and a few seconds after it a lightning will strike – dodge to the right and you should get out of its way. Bayle also has access to a similar attack, in which he raises his wing, but a bit lower than the last time – right after hitting you, he will try to bite you. After that, he may breathe out fire.
Occasionally, Bayle will begin to roar, summoning lightning strikes. Sprinting should be enough to avoid them – if you are close to Bayle, you can land one blow on his head.
The second phase of the fight begins when Bayle drops to approximately 66% health. It is similar to the first one, apart from the aforementioned modified attacks and a few new dangerous moves. The second phase always begins with a specific combination – Bayle roars, summoning pillars of fire around him. He then takes to the sky and starts circling the arena, shooting fireballs at you – lock the camera on him and sprint diagonally in the opposite direction of Bayle. The dragon will try to crush you upon landing – dodge towards him. You have to be very precise, so be ready to take damage.
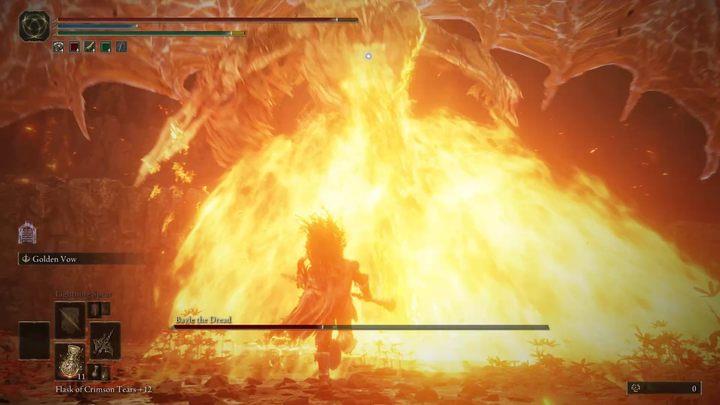
The huge laser attack is also dangerous – Bayle rises into the air and fires the laser twice, once horizontally, then vertically. The horizontal laser will never hit you if you keep your distance – dodge with a delay before the explosion left by the laser. You will see a vertical laser coming your way – dodge towards the laser, then dodge again with a delay to avoid the explosion.

What are the best strategies to avoid Bayle’s deadly attacks
To avoid Bayle the Dread’s deadly attacks in Elden Ring’s Shadow of the Erdtree, follow these strategies:
1. Positioning and Dodging
-
Stay Near the Head: Position yourself near Bayle’s head, as it’s the only part you can reliably lock onto and hit. This also helps you avoid getting caught under the dragon, where camera angles can make attacks harder to read.
-
Dodge to the Side or Back: Most of Bayle’s attacks, such as claw sweeps and bites, are telegraphed but delayed. Dodge to the side or backwards to avoid them.
2. Recognizing and Countering Specific Attacks
-
Lightning Bite Grab: If Bayle gathers lightning in his mouth, roll to the side to avoid the lethal bite grab.
-
Lightning Strikes: When Bayle roars on the ground, multiple lightning strikes will follow. Dodge roll repeatedly or sprint to evade these.
-
Claw Sweeps and Slam: If Bayle rears back and roars, he’ll perform a combo of claw sweeps followed by a slam. Roll to the side for the sweeps and backwards for the slam.
-
Tail Swipe: If Bayle leaps back and turns his body, he’ll perform a tail swipe. Dodge in any direction to avoid this.
3. Dealing with Fire Breath Attacks
-
Sweeping Fire: Roll directly through the fire as it passes you.
-
Direct Fire Breath: Sprint or dodge to the side to avoid direct fire.
-
Fire Below: Sprint or roll away from Bayle.
4. Phase Transitions
-
Second Phase (Below 50% Health): Bayle gains new attacks and becomes more aggressive. Keep a safe distance and be prepared to dodge more frequently. His transformation is visually dramatic, but it signals increased danger, so maintain distance and be cautious of new lightning attacks.
5. General Tips
-
Use Longer Weapons: Utilize longer weapons to strike Bayle’s head during breath attacks.
-
Avoid Cornering: Ensure you have space to dodge and counterattack without being cornered by Bayle.
-
Choose the Right Gear: Consider using weapons like the Dragon-Hunter’s Great Katana, which is well-suited for this fight.
What are the key patterns to recognize in Bayle’s movements
Recognizing Bayle the Dread’s movement patterns is crucial for a successful fight in Elden Ring. Here are the key patterns to watch out for:
1. Attack Telegraphs
-
Maul: Bayle straightens his body, and his mouth glows orange before lunging forward. This is a clear signal to dodge backwards.
-
Fatal Crush: Bayle coats his body in flame-lightning and leaps into the air. Be prepared to dodge at the last second.
-
Lunging Claw Stab: Bayle hunches back slightly before lunging forward with his claw. This attack happens quickly, so be ready to roll to the side.
2. Breath Attacks
-
Sweeping Lightning Breath: Bayle breathes fire and lightning from one side of the arena to the other. You can dodge roll through this attack.
-
Downward Lightning Breath: Bayle breathes fire and lightning downward, covering a large area under him. Dodge roll out of the AoE or run away.
-
Beam Lightning Breath: Bayle breathes fire and lightning directly at you. This attack doesn’t track your movement, so dodge to the side.
3. Physical Attacks
-
Tail Swipe: Bayle turns his body, signaling a tail swipe. Time your dodge roll as he turns.
-
Lunging Bite Multiattack: Bayle sweeps with his wings before biting forward. Run backwards or under his body to avoid this.
-
Fatal Stomp: Bayle hovers briefly before gliding toward you and landing with force. Run away or dodge to avoid the impact.
4. Phase Transitions
-
Bayle’s Tyranny: Bayle channels energy, creating molten marks on the ground, which explode and signal the start of the second phase. Use this time for ranged attacks.
5. Aerial Attacks
-
Aerial Bombardment: Bayle flies into the air, completing a half circuit of the arena before crashing down. Dodge the flame projectiles by running perpendicular to their path or rolling into Bayle as he slides past.
-
Burning Skies: Bayle flies across the arena, breathing fire below. Roll through the flames or to the side to avoid the fire and subsequent explosions.
By recognizing these patterns, you can anticipate and react to Bayle’s attacks effectively.