Setting up a Minecraft server can transform your gaming experience from solitary exploration to a vibrant multiplayer adventure. With the right guidance, you can create a customized world where friends gather to build, battle, and collaborate. This comprehensive guide will walk you through the essential steps of server management, from installation to configuration, ensuring that your virtual realm is not only functional but also tailored to your unique gameplay preferences. Whether you’re a seasoned player or a newcomer, mastering the intricacies of server setup will unlock endless possibilities in the blocky universe of Minecraft.
First configuration
Setting up your first Minecraft server involves several essential steps to ensure a smooth launch and an enjoyable multiplayer experience. Begin by downloading the latest server software from the official Minecraft website, ensuring it matches your game version. Create a dedicated folder on your computer to store the server files, and place the downloaded .jar file in this folder. After that, run the server for the first time; this will generate configuration files, including eula.txt, which you must edit to accept the End User License Agreement by changing eula=false to eula=true. Finally, adjust the server.properties file to customize settings such as game mode and difficulty before starting the server again. This initial configuration sets the foundation for a successful multiplayer environment where you and your friends can explore and build together.
The server’s files
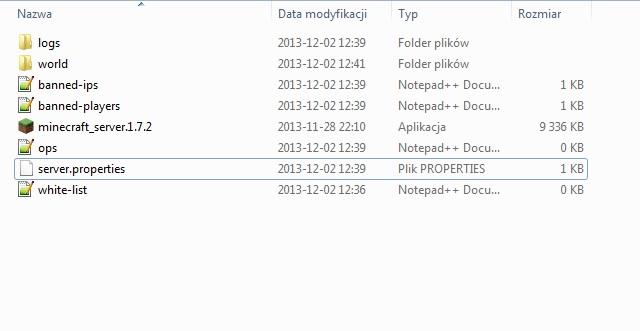
The basic thing for the proper functioning of the server is not only to turn it on, but also to configure it properly and manage during its operation. In the server folder, by default, there are five files:
- Folder logs – contains all of the information (logs) concerning the course of the server’s operation, i.e. first of all error messages, or e.g. information on the dates of backup performance, times at which the individual players joined in.
- Folder world – this folder may have a different name, depending on what name it has been given during the setup process (more about that below). it includes all of the information concerning the game world. It is a good idea to make backup copies of this file frequently (you can do that with appropriate software, or even manually). If there are many players playing on your server, this file may be quite sizeable, depending on how big the generated world is (you can restrict the size in options).
- Banned-ips.txt – allows you to ban any user from the server. using a word processor, you need to enter the following data:
- The player’s Nick/ip | banned on | the nickname of the administrator who banned the player | ban’s expiry date| ban reason
- Banned players.txt – displays the list of the banned players.
- Ops.txt – the list of all users, with authorization given by the administrator (who have maximum priority, may use the command console, etc.). To add a player to the list, you need to use the server’s command console: op player’s_nickname or in the game: /op player’s_nickname
- White-list.txt – it is a list of the players who have access to the server (setting for privately-held servers without access to Local Area Networks (LAN). To add a user to the list, use the server’s console: whitelist add username or in the game: /whitelist add username
- Server.properties – the main configuration file. Enables setting up and management of the server. All functions explained below:
generator-settings= name, allows to set up the parameters of the generated world in the Superflaf mode (empty by default)
op-permission-level= 1-4, gives the administrator rights (ops), 1 – ops may avoid spawn protection (build in areas blocked for spawning), 2 – ops may use the console functions: /clear, /difficulty, /effect, /gamemode, /gamerule, /give, and /tp, and edit command blocks, 3 – ops may use /ban, /deop, /kick and /op, 4 – ops may use /stop (4 by default)
allow-nether= true/false, determines the availability of teleportation to the Nether (true by default)
level-name= own name, it is the name of a game world introduced by you, and also the name of a folder on the server, which stores this world. (world by default)
enable-query= true/false, used to obtain information about the server (false by default)
allow-flight= true/false, prevents from cheating, by flying, on servers configured for the Survival mode – if the player is flying longer than 5 seconds, (falls do not count) he will be automatically kicked out of the server (false by default)
announce-player-achievements= true/false, permission to notify the players of gained achievements (true by default)
server-port= 1-65534, determines which gameport the connection is realized (25565 by default)
level-type= name, determines the kind of the generated map: DEFAULT – default, FLAT – flat map, LARGEBIOMES – large biomes, AMPLIFIED – like the default one, increased diversification of terrain (DEFAULT by default)
enable-rcon= true/false, enables remote access to the console (false by default)
force-gamemode= true/false, makes the player join the default game mode (false by default)
level-seed= seed_number, allows for generating the world from seed (empty by default)
server-ip= numerical_value, if you want the IP address of your server to be different than the default one, you enter it here (if you do not know what your IP is, you may leave this field blank and the default IP will be allotted) (empty by default)
max-build-height= numerical_value, determines how high you can build before you reach the boundary (256 by default)
spawn-npcs= true/false, determines if the NPCs, the villagers in randomly generated villages, are to be spawned (true by default)
white-list= true/false, determines if the white-list (the list of the players that are permitted to join in) is to be active or not (false by default)
spawn-animals= true/false, determines if the animals are to be spawned (true by default )
snooper-enabled= true/false, you determine here if you want certain data, of the gameplay, is to be send to the server of the Minecraft developers, in order to improve on the future versions of the game (true by default )
hardcore= true/false, allows the activation of the Hardcore mode. The rule which works for servers is that if a player dies, he/she is banned (false by default )
online-mode= true/false, safety mode, safety mode, disallows the joining of the client’s illegal versions (true by default )
resource-pack= name, forces a client to download a “resource pack” (a mod pack) , in the form of a .zip archive, located on the server (empty by default)
pvp= true/false, determines the availability of fights among players (it is inactive, a player can still be killed with traps, using the e.g. lava or TNT) (true by default )
difficulty= 0-3, determines the difficulty level on the server (0 – peaceful, 1 – easy, 2 – normal, 3 – hard) (1 by default)
enable-command-block= true/false, activates/deactivates the command block function (false by default )
player-idle-timeout= numerical_value, if user have been inactive for a certain number of minutes, they are kicked out of the server (0 by default)
gamemode= 0-2, determines game mode (0 – survival, 1 – creative, 2 – adventure)
max-players= 0-2147483647, determines the number of players that can be simultaneously logged onto the server (20 by default)
spawn-monsters= true/false, determines the spawning of monsters (mobs) (true by default )
view-distance= 3-15, determines the visibility of the world for each of the players (the greater the numerical value the greater the network load for the server) (10 by default)
generate-structures= true/false, allows you to enable/disable generating of default structures, such as NPC villages or Dungeons (true by default )
spawn-protection= numerical_value, determines the size of the field around the spawning (a square) is to be banned from building, for regular players (16 by default)
motd= own_name (up to 59 characters), the server’s name visible for users (A Minecraft Server by default)
The true/false values are to be interpreted as yes/no.
Administrator’s (operator’s) commands and functions
Administrator commands and functions in a Minecraft server play a crucial role in managing gameplay and ensuring a smooth experience for all players. Operators, often referred to as “admins,” are granted special privileges that allow them to execute commands that can change game settings, manage player permissions, and maintain server integrity. Key functions include setting the game mode (e.g., survival, creative), adjusting difficulty levels, managing player bans or whitelists, and controlling world settings through the server.properties file. Additionally, operators can use commands like /tp to teleport players, /give to provide items, and /kick or /ban to remove disruptive players from the server. These tools empower admins to create a tailored gaming environment while ensuring compliance with community standards.
Just like in the case of most multiplayer games, you manage the game be means of the console and commands that you enter into that console. Below, you can find the command list (additional plug-ins and mods may add own commands).
- Help or ? – displays commands available for use in the console
- Whitelist on/off – switches on and off the white-list (the availability to add only specific players to the server)
- Whitelist add player-name – adds the player of the specified nickname to the whitelist
- Whitelist list – displays players on the whitelist
- Whitelist reload – refreshes the whitelist
- Kick player_name_reason– a single instance of kicking a player out of the server
- Ban player_name_reason – bans permanently a given player
- Pardon player_name – lifts ban from a player
- Ban-ip player_ip– bans a player through their IP address
- Banlist – displays the list of banned players
- Op player_name – provides the administrative (operator’s) rights to a player
- Deop player_name – lifts administrative rights
- Tp player_name1 player_name2 – transfers the first entered player to the second one
- Give player_name item_id_number– gives an item to the player (determined by the ID, not the name) in the specified numbers
- Tell player_name message_text– sends a private message to a player
- Stop – stops the server
- Save-all – forces saving of the world
- Save-on/off – activates/deactivates autosave
- Say message_text – sends a message to all players
- Time add/set _number – on a scale of 0-2400 adds or sets the determined in-game time
- Gamemode player_name_number – endows the selected player with a given game mode
- Xp player_name_amount – adds, or removes (if it is a negative number) the specified number of experience points
- Toggledownfall – switches between rainfall and snowfall
- List – displays the list of players currently on the server
Player commands and features
Player commands and features in Minecraft servers are essential for managing gameplay and enhancing player interactions. Server administrators can utilize various commands to control the environment, such as /whitelist add username to manage player access or /gamemode player_name number to change a player’s game mode. Additionally, commands like /tp player_name1 player_name2 allow for teleportation between players, while /give player_name item_id_number enables item distribution. These commands not only facilitate server management but also enrich the multiplayer experience by allowing for customized interactions and ensuring fair play among participants. Understanding and effectively using these commands is crucial for maintaining an enjoyable and organized gaming environment.
Also a player, with his/her rights restricted, may use several commands:
- /kill – takes 1000 health points from the player. Used especially when the player stuck or, e.g. fell into The Void
- /me _action– sends message to all
- /tell player_name message_text– sends a private message to the specified player
What are the best practices for managing a Minecraft server
Managing a Minecraft server effectively requires a combination of technical knowledge, community engagement, and strategic planning. Here are some best practices to ensure a smooth and enjoyable experience for both administrators and players:
Key Best Practices for Managing a Minecraft Server
1. Monitor Server Resources
Keeping a close eye on server resources is crucial. Allocate sufficient RAM based on your player count—1-2 GB for small servers (up to 10 players) and at least 4 GB for larger ones. Regularly check CPU and memory usage to prevent performance issues.
2. Implement Regular Backups
Automate daily backups of your server data, including world files and configurations. This prevents data loss from crashes or corruption and ensures that you can restore your server to a previous state if necessary.
3. Use Plugins Wisely
Plugins enhance gameplay and server management. Use established plugins to add features, improve performance, and implement anti-cheat measures. However, avoid overwhelming your server with too many plugins at once; introduce them gradually to maintain stability.
4. Establish Clear Rules and Moderation
Set clear rules for player behavior and enforce them consistently. Appoint trusted moderators to help manage the community and address issues as they arise. This fosters a positive environment and reduces conflicts among players.
5. Optimize Server Configuration
Regularly review and adjust server settings such as game mode, difficulty, and player limits through a management panel or configuration files. This fine-tuning can significantly enhance the gaming experience.
6. Schedule Regular Maintenance
Plan scheduled restarts to clear memory leaks and optimize performance. This helps prevent lag during peak hours and keeps the server running smoothly.
7. Engage with the Community
Create channels for player feedback and communication. Understanding your community’s desires can help tailor the server experience to retain players and attract new ones. Consider hosting events or contests to increase engagement.
8. Stay Updated
Keep your server software up-to-date with the latest patches and versions to ensure security and access to new features. Regular updates help protect against vulnerabilities that could be exploited by malicious players.
By following these best practices, you can create a robust Minecraft server that not only runs efficiently but also provides an engaging environment for players to explore, build, and collaborate together.
How can I effectively manage resources on my Minecraft server
Effectively managing resources on your Minecraft server is essential for ensuring a smooth and enjoyable gameplay experience. Here are some key strategies to optimize resource management:
1. Monitor Server Performance
Regularly check the server’s CPU and RAM usage to understand how well it handles player activity. Allocate enough RAM based on your expected player count—1-2 GB for small servers and at least 4 GB for larger ones. Use monitoring tools to identify any performance bottlenecks that may arise during peak times.
2. Optimize Server Settings
Adjust settings like render distance, view distance, and entity distance to reduce lag and improve performance. These settings can significantly impact how much data the server processes, especially with many players online.
3. Implement Caching Techniques
Utilize caching plugins such as Bukkit or Spigot to store frequently accessed data, which can help reduce CPU load and improve server response times. This is particularly useful for high-traffic servers where performance is critical.
4. Automate Backups
Set up automatic backups of your server data to prevent loss from crashes or corruption. Regular backups ensure that player progress and server configurations are safe, allowing for quick recovery in case of issues.
5. Use Plugins Wisely
Incorporate plugins that enhance gameplay and performance without overwhelming the server. Choose plugins that fit your server’s theme and needs, and manage them carefully to avoid conflicts or excessive resource consumption.
6. Schedule Regular Maintenance
Plan scheduled restarts to clear memory leaks and optimize performance. This practice helps prevent lag and keeps the server running smoothly over time.
7. Engage with Your Community
Encourage player feedback on server performance and resource management. Understanding player experiences can help you make informed decisions about necessary adjustments or upgrades.
By implementing these strategies, you can effectively manage resources on your Minecraft server, ensuring a stable environment for players to enjoy their adventures.